Category Archives: Desserts

My Grandmother’s Cookies

img_0155

My grandmother used to make these butter cookies. She always had a tin of them around so she could have one or two with her afternoon glass of sherry, hers were about the size of a silver dollar.  I don't remember her measuring anything when she made them, and in my memory they were almost instant - a few minutes of mixing things together and there they were - all delicate, crisp and buttery. (Then again, I recall my vantage point being about 8" above the counter top and time is so different when you are a kid.) My grandmother died long before I ever thought to ask her for her recipe, and before internets I figured it was lost.  So I had an "Ask Auntie Google" moment and there they were, in this lovely photo.

The recipe is apparently from the box of Swan Potato Starch Flour.  I can't find Swan in my local supermarket to verify this, but Bob's Red Mill makes Potato Starch Flour (and Potato Starch) which I found at my local health food store.  Just in case you are about to make the same mistake I did .... Potato Flour and Potato Starch Flour are not the same thing.  Trust me on this one, Potato Flour makes a yucky tasting cookie. I don't remember grandma using two flours but then again I don't remember much of what went into them, but the texture and flavor of this cookie is what I do remember.

I'm pretty sure my grandmother could make these much faster than I did, but they come together very quickly, even without getting out the mixer. For variety, you can stir in a teaspoon of lemon zest or orange zest along with the egg to give them a citrusy hit.  You can form the dough into a log, an inch or less in diameter, and freeze it.  Slice into 1/4" (.6 mm) thick slices, let them defrost while the oven heats up and bake whenever the need for these cookies strikes.

1 cup (227 g) butter, softened
1 cup (220 g) sugar (I used organic with good results.)
1 egg
1 1/2 teaspoons (7.5 ml) vanilla extract (use the best vanilla you can find)
1 cup ( 150 g) potato starch flour
1 cup ( 120 g) all purpose flour

img_0158
  1. Cream together butter and sugar.
  2. Beat in egg and vanilla.
  3. Sift together flour and potato starch flour, or use a whisk to combine them thoroughly. Add to butter mixture and stir until combined.
  4. Chill dough for about an hour. (I'm impatient, I skipped this and used a 1 tablespoon (15 ml) size scoop to portion out the dough. There was no difference in the baked cookies, but it is easier to work with when it is cold.)
  5. Roll into small balls and place on un-greased or parchment lined cookie sheets. (A 1 tablespoon size scoop/1 inch ball yielded a cookie about 3 inches in diameter when baked on parchment paper and 4 inches in diameter and flatter when baked directly on the baking sheet. This was almost too big - the edges of the cookie begin to get lacy and very fragile so I'd go with less than 1 tablespoon as a better size.)
  6. Press gently with palm of hand to flatten the dough down to about a 1/4 inch thick disk.
  7. Bake at 375º F ( 190º C) for 10 minutes if cookies are directly on baking sheet and about 14 minutes if on parchment, or until edges are just golden brown. Let cookies cool slightly on the baking sheet, then transfer cookies to wire rack to cool completely.  The cookies will crisp up as they cool

White Peach Sorbet

IMG_0038

I was at the Costco yesterday when the aroma of ripe white peach reached out its tendrils and lassoed me into submission. I controlled myself and only bought one flat of a dozen peaches.

Given that there are only three of us in the house; that there are only so many bowls of peaches and cream one can consume with out suffering the consequences, and that there are only so many days between perfect peaches becoming overripe yucky peaches, I decided that white peach sorbet would be a good stab at preserving the essence of ripe white peach for another day. I’m going to try a tiny scoop in a glass of proseco when I next have an excuse to open a bottle, but we’ve enjoyed it as is – just a scoop of cold white peach loveliness.

The following recipe is adapted slightly from an online Martha Stewart recipe.  I didn’t think I wanted to post this initially so I don’t have any photos of how things looked along the way from peach to sorbet. I tried to do away with the fiddly measurements and clarify the fuzzy measurements – so it’s a little easier on the measuring end of things and still lovely on the eating end of things.

1 cup (220 g) sugar (I use organic)IMG_0040
1 cup (250 ml) water
4 large white peaches (approximately 2 lbs/906 g), pitted and peeled (it’s OK if there are some little bits of peel left – they basically disappear in the blender)
1/2 cup (125 ml) lemon juice
pinch of salt
1 tablespoon (15 ml) rum (white or golden)

1) Bring the sugar and water to a boil in a small sauce pan, giving it a stir now and then until the sugar is dissolved. Remove from the heat and cool (you can use an ice bath to speed the cooling process).

2) Combine 1 1/2 cups of the simple syrup, peaches, lemon juice and salt in a blender and process until completely smooth.  Place in the refrigerator and chill until very cold, about 4 hours – if you are a temperature taking sort, well below 40°F (about 4° C).  (For the impatient folks like me: I put the peach mixture in a metal bowl then put that bowl over an ice bath and placed the whole shebang into the fridge for an hour or two.)  Chill any remaining simple syrup for further use, it will keep for weeks.

3) Process the mixture in an ice cream maker until soft frozen. Add the rum when the mixture is slushy and almost done.  Transfer to a container and freeze until ready to use.  Yields about 1 1/2 quarts.

Burnt Sugar Cake

burnt sugar cake

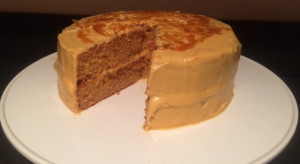
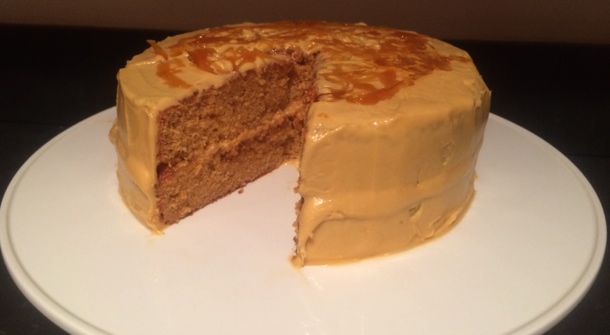
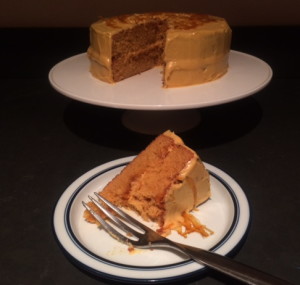
I had some time on my hands the other day, picked up James Beard’s American Cookery and got myself good and lost in it.  About forty-five minutes in I ran into “Burnt Leather, Brownstone Front, or Caramel Cake.” Caramel CAKE? Dead stop, must make.

I did a little looking around and found an article from 1996 by Marrion Cunningham in the LA Times, “At Last! True Burnt Sugar,” in which she says that Burnt Sugar Cake was  “one of the most popular desserts around the turn of the century.” She goes on to gush about the caramel syrup that is the heart of the matter and frankly, I think I’m going to follow suit and pour some over poached pears and try it on oatmeal next time I make some. Joy has a recipe for burnt sugar cake as well but theirs involves whipping the egg whites and folding them in at the end which is fussier than I want to get at home.  The recipe that follows is a little bit James and a little bit Marrion, with a little more syrup and a little more salt here and there because it seemed to want it.  James recommends either vanilla or rum – to which I thought – why choose?  The caramel and vanilla and rum make such lovely harmonies together in there I had to go with both.

One of my tasters thought it would be nice if there were some little crunchy bits of caramelized sugar in there which lead to the idea of the lacy sugar topping. It started out a bit lacier than it ended up since I forgot I’d stashed it in the oven and preheated the oven to bake the cakes with it in there so it softened a bit and the lacier bits kinda blobbed out but you get the idea. I suppose if you really wanted to go all out, you could make little panels of sugar and press them to the sides of the cake as well.

Since it’s been snowy and icy and who-wants-to-go-out-in-it around here, I’ve had a chance to make and tweak this cake a few times. It makes a nice partner to an afternoon cup of tea.

Caramel Syrup:

1 cup (230 g) sugar
3/4 cup hot water (180 ml), plus a few tablespoons, optional

burnt sugar syrup

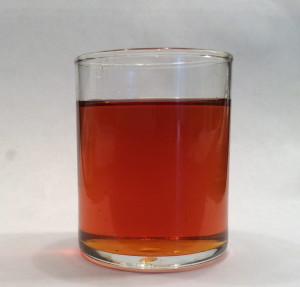
  1. Place the sugar in a heavy skillet (not non stick).  Stir a few tablespoons of water into the sugar, three or so should do it – you want it to look like wet sand that’s the right consistency for a dribble castle.  If you over do it, don’t worry, it will just take a little longer to caramelize the syrup.
  2. Bring the mixture to a boil and let it simmer until it turns a deep golden color, emits the faintest whiff of smoke, and smells right to you – it should smell like caramel, a touch burnt but not too much (about 10 minutes). Once the sugar begins to melt don’t walk away from the pan, the color deepens rapidly.
  3. Remove the pan from the heat and carefully pour in a little of the water.  The mixture will sputter vigorously so don’t get too close to it.  Keep adding the water a little at a time as the sputtering slows down.
  4. Return the pan to the heat and stir until the caramel re-dissolves, and the syrup thickens a little. (A heat-proof silicon spatula is the best tool for the job.)
  5. Cool.

A note about sugar: if you use organic sugar omit the water in the beginning; strange, strange things happen when you try the water in the sugar/melt method.  For organic sugar just put the sugar in the pan and turn the heat to high. When the sugar begins to melt around the edges, lower the heat, and kind of mash the unmelted sugar into the sugar that is melting using a silicon or heat proof spatula or spoon.  It may form lumps, be patient and keep stirring/mashing the lumps and it will eventually all melt.  Organic sugar starts off a golden color when melted so to tell when it’s done keep taking a whiff of it and when it smells like caramel, it’s done.

Yield:  1 cup (about) syrup

If you are confident about the whole melting sugar process you can make the lacy caramel topping for the cake from the melted sugar for the syrup, you only need about a tablespoon.

Cake:

2  cups (243 g) cake flour
1 tablespoon (15 ml) baking powder
3/4 teaspoon (3.75 ml) salt
1/2 cup (113 g) salted butter, 1 stick
1 cup (230 g) sugar
2 eggs
1/3 cup (80 ml) caramel syrup
1 teaspoon (5 ml) vanilla
1 tablespoon (15 ml) dark rum
3/4 cup (180 ml) milk

  1. Preheat oven to 350°.
  2. Grease two 8″ cake pans with butter or Pam, line with parchment paper, grease the paper and flour the pans, set aside. Alternatively you can just grease and flour the pans, but I like the added security that the parchment paper gives.
  3. Sift the flour, baking powder and salt together in a bowl and set aside.
  4. Cream the butter and sugar until light and fluffy.
  5. Beat in the eggs, one at a time, then the vanilla and rum.
  6. Mix in the dry ingredients alternating with the milk in 3 batches.  Stir in the caramel syrup.
  7. Pour into the prepared pans and bake for 25 – 30 minutes or until cake springs back lightly in center and a tester comes out clean. (If you are a touch neurotic, like me, about dividing the batter in half evenly it worked out to about 15.5 oz. of raw batter per pan.)
  8. Let cake cool on a wire rack for 10 minutes then invert cakes onto your hand, remove parchment paper, turn upright again on the wire rack and cool completely.
  9. When the cakes are cool, level them if desired, poke them with a fork or skewer and brush with some of the caramel syrup, about a tablespoon per layer.

Frosting:
1/2 cup (113 g) salted butter, 1 stick
1/2 teaspoon (2.5 ml) salt
2 egg yolks
1 1/2 cups (200 g) powdered sugar
1/3 cup (80 ml) caramel syrup
1/2 teaspoon (2.5 ml) vanilla

  1. In the bowl of a standing mixer beat the butter until it is very creamy and almost white, about 8 – 10 minutes.Beat in the salt.
  2. Add the yolks one at a time, beating until combined.
  3. Add the sugar 1/4 cup at a time beating until well incorporated.
  4. Beat in the caramel syrup and vanilla. Test a little of the frosting if it is the least bit gritty continue beating until all the sugar and salt are absorbed. When the cakes are cooled, fill and frost.

I kept the cake in the fridge, with some plastic wrap pressed to the exposed cake to keep it from drying out and we whittled away at it for three days and it seemed to hold just fine. Let the cake come to room temperature before eating it, the flavor is better when it has warmed up a little.

Lacy Caramel Topping:

1/4 cup sugar
Parchment paper
Butter or Pam

IMG_0133

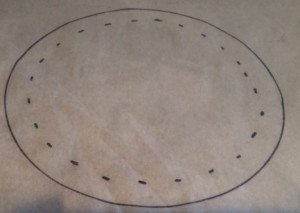
  1. Trace the bottom of your cake pan onto the parchment paper.  About 1/2 inch in from the circle, make a series of dots to form a smaller, inner circle.  Turn the parchment paper over and place on a sheet tray ink-side down.  Grease the circle.
  2. Melt the sugar as you would for the caramel topping.
  3. As soon as it begins to turn golden pull the pan off the heat and swirl it around a little so it starts to cool a bit.
  4. Keeping the pan very close to the sheet tray so you don’t end up with sugar threads everywhere, use a fork to pick up bits of the syrup and drizzle it onto the parchment paper.  Drizzle into the inner circle so it will fit neatly on top of the cake.  The cooled sugar breaks easily so you can easily trim your lacy top to fit but there is something satisfying about coloring inside the lines every now and then.

If you have extra melted sugar, you can add a little water and make more syrup if you want.

Gently peel the hardened sugar off the parchment and place on top of the cake.

IMG_0137


Summer Pie

IMG_0907

We were invited to a Fourth of July barbecue a few weeks ago.  As I always do, I asked our host if there was anything I could bring, and knowing that our host has a bit of a sweet tooth got all excited about making this pie to bring along (not only do I get to have a piece but there is no pie hanging around tempting me to eat more than is prudent).  The party ended up being cancelled, but at that point I had all the ingredients on hand  and was so excited about having a piece of this that I just had to make it happen.

Three or four weeks a year the season for cherries, blueberries and peaches overlap and when it rolls around on the calendar, I can’t help myself, I’ve got to make what I think of as summer pie.  I love this combination of fruit and there is something about the fact that the window for obtaining ripe cherries, blueberries and peaches is so fleeting makes it seem extra special.  So when I got the news that the party was cancelled and no longer had people to share it with I was a bit disappointed – and then we ended up having company a few nights later so (oh joy!) I had a reason to make it. I wasn’t entirely happy with the way the first one came out – too runny.  So I tried it two more times increasing the amount of starch each time.  The last go around I didn’t have the time to make a crust, so I packed the fruit into the pie plate and topped it with the crumble mixture, which was also good if you want to take a short cut and not bother about the pie crust.

This is not a tidy slice, art director favorite kind of pie.  It is looser, more slumpy, more fruit crumble kind of pie.  So if you want something that doesn’t droop in the least, this may not be your kind of pie.  But if you want a slice of summer, drips and all, this might be for you.

Pie:
1 – 9″ pie crust, placed in a glass pie plate and refrigerated until ready to fill. (I am going to assume here that you are either a pie crust maker or not.  And if you ARE a pie crust maker I’m going to assume you have a recipe you like. And if you are NOT a pie crust maker just use whichever pre-made version you prefer  – I’m not going to judge you either way.) I like glass because it takes any guesswork out of whether or not the crust is cooked.

Crumble:IMG_0910IMG_0909
1 cup flour
1/2 cup light brown sugar
1/2 cup granulated sugar
1 /2 teaspoon
1/2 teaspoon cinnamon
1/2 teaspoon salt
pinch of freshly grated nutmeg
1/2 cup butter

Filling:IMG_0911IMG_0908
2 cups halved, pitted cherries
2 cups blueberries
1 1/4 lbs peaches (about 4 regular, 5 organic), pitted and sliced into 1/2″ inch wedges
1/2 cup sugar
6 tablespoons tapioca starch (or corn starch)
1 teaspoon lemon zest
2 teaspoons lemon juice

  1. Preheat oven to 375°.
  2. Combine flour, sugars, salt, cinnamon and nutmeg in a food processor or large bowl.  Pulse a few times to combine thoroughly or whisk together until well combined, if not using a food processor.  Cut the butter into small cubes and pulse into the flour mixture until it resembles a coarse meal – some little butter bits are fine.  Alternatively, use a pastry blender or two knives to achieve the same texture. (That picture up there in the food processor is what it looked like when it was done.) Set the mixture aside until you are ready to top the pie.  This can be done a day or so in advance and refrigerated until you are ready to use it.
  3. Combine the fruit with the sugar, tapioca starch lemon zest and lemon juice.  Allow to macerate for 10 minutes or so.IMG_0916
  4. Pack the fruit into the pie shell.  Don’t be shy, really press it in there – it will settle as it cooks in any case but the topping will crack less when the cooked fruit settles.
  5. Bake the pie on a baking sheet for 1 hour 45 minutes, checking at 1 hour 30 minutes just to make sure you aren’t over doing things.  The crust should be golden brown and the filing will be bubbly and overflowing a bit.  (Hence the recommended baking sheet.)
  6. Allow the pie to cool on a wire rack as long as you can stand it – at least 2 hours (I actually threw this one in the fridge to take the heat down faster because I only had an hour until dessert time). Warm pie is my favorite but room temperature won’t hurt anything.  Serve with vanilla ice cream – or not.